
Introduction to AWS VPC: The Backbone of Your Cloud Infrastructure
In the modern era of cloud computing, security isn’t just a feature—it’s the foundation. AWS VPC (Virtual Private Cloud) is the fundamental building block that allows you to carve out a private, isolated section of the Amazon Web Services cloud. Think of it as your own digital data center, but without the hassle of physical cables or hardware maintenance.
Whether you are hosting a simple web application or a complex microservices architecture, the VPC gives you complete control over your virtual networking environment. From defining your own IP address ranges and creating subnets to configuring route tables and network gateways, the AWS VPC ensures your data stays exactly where it belongs. As we move further into 2026, understanding the nuances of VPC connectivity and “Zero-Trust” security is no longer optional—it is a prerequisite for any robust cloud strategy.
Think of an AWS VPC (Virtual Private Cloud) as your own private neighborhood inside the giant city of AWS. In this city, everyone shares the same land, but your VPC is a gated area where you decide the rules, who can enter, and how the “houses” (your servers) talk to each other.
🏘️ The Neighborhood Analogy
- VPC = The Entire Gated Community: This is the whole plot of land you own. It’s isolated from other neighborhoods, and nothing gets in or out unless you allow it.
- Subnets = Individual Streets: You divide your land into streets.
- Public Subnet: Like a main street with a cafe. Anyone from the “Internet City” can visit.
- Private Subnet: Like a quiet, hidden cul-de-sac. No one from the outside can even see it exists.
- Internet Gateway (IGW) = The Main Front Gate: This is the only way for people from the outside world to drive into your public subnets.
- NAT Gateway = A One-Way Exit: Imagine a back door where your residents can go out to buy groceries (download updates), but strangers can’t use that door to sneak in.
🧱 Core Components (The Technical Bits)
To build your VPC, you need these four pillars:
Component | Real-World Role | Technical Function |
CIDR Block | The Zip Code | A range of private IP addresses (e.g., 10.0.0.0/16) for your whole network. |
Subnets | The Floors/Streets | Segments of your IP range. Public subnets have a route to the internet; private ones do not. |
Route Tables | The GPS / Map | A set of rules (routes) that tell data where to go. For example, “If you’re looking for the internet, go to the Front Gate (IGW).” |
Security Groups | The Bouncer | A “virtual firewall” for your servers. It checks the ID of everyone trying to enter a specific “house.” |
🛡️ Security: Two Layers of Defense
VPC security is like having a security team at the community gate AND at your front door. [15, 16]
- Network ACLs (NACLs): These are the Security Guards at the neighborhood entrance. They check everyone entering or leaving the entire street (subnet). They are “stateless,” meaning they don’t remember you—they check your ID every single time you pass, whether you’re coming or going.
- Security Groups: These are the Bouncers at the door of your house (the specific EC2 instance). They are “stateful”—if they let you in to deliver a pizza, they’ll automatically let you back out without checking your ID again.
🚀 Getting Started
Every AWS account comes with a Default VPC in every region. This is like a “pre-built apartment” that’s already connected to the internet so you can start launching servers (EC2 instances) immediately without being a networking expert.
“VPC and more” wizard, which is the easiest way for students to see how all the parts (subnets, gateways, and route tables) connect at once.
🛠️ Step-by-Step: Creating Your First Custom VPC
- Access the VPC Dashboard
Log in to the AWS Management Console and search for “VPC” in the top search bar. Make sure you have selected your preferred region (e.g., US East N. Virginia) in the top right corner. - Start the VPC Wizard
Click the orange Create VPC button. On the next screen, select “VPC and more” under Resources to create. This automatically sets up your subnets and gateways in one go, rather than making you create each one manually. - Configure Your Network
- Name tag auto-generation: Enter a name like MyStudentVPC. This will automatically name all your subnets and route tables for you.
- IPv4 CIDR block: Use 10.0.0.0/16. This gives your “neighborhood” 65,536 available internal IP addresses.
- Tenancy: Keep this as Default to avoid the high costs of dedicated hardware.
- Define Your Streets (Subnets)
- Availability Zones (AZs): Choose 2 AZs for high availability (this ensures if one data center goes down, your neighborhood stays up).
- Public subnets: Choose 2. These are your “main streets” connected to the internet.
- Private subnets: Choose 2. These are for your secure “houses,” like databases.
- Set the Gates (Gateways)
- NAT Gateway: Select 1 per AZ if you want your private servers to download updates from the internet.
Note: NAT Gateways have a small hourly cost. For a free lab, you can select None, though your private servers won’t reach the internet. - VPC Endpoints: Choose S3 Gateway if you want a direct, private “tunnel” to Amazon S3 storage.
- NAT Gateway: Select 1 per AZ if you want your private servers to download updates from the internet.
- Verify and Create
Look at the Preview Pane on the right side of the screen. You’ll see a visual map of how your subnets will talk to the Internet Gateway. Click Create VPC. AWS will now build everything in about 30–60 seconds.
✅ Next Step: The Bouncers (Security Groups)
Now that the neighborhood is built, you need to set up the “Bouncers” before you launch any servers. By default, your Security Group will block all incoming traffic.
- Go to Security Groups in the left menu.
- Select the one for your new VPC and click Edit inbound rules.
- Add a rule for Type: SSH (port 22) and set the Source to My IP so only you can enter your “house”.
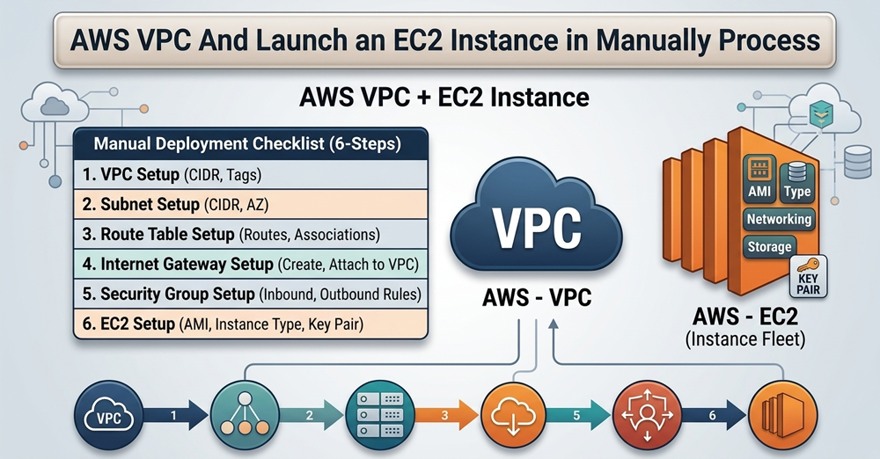
Hands-on Guide: Follows This 10-step blueprint for VPC
This hands-on guide follows your 10-step blueprint exactly. This “manual” approach is the best way to understand how traffic flows through AWS.
Step 1: Create your VPC
- Go to VPC Dashboard > Your VPCs > Create VPC.
- Select VPC only.
- Name: MyManualVPC
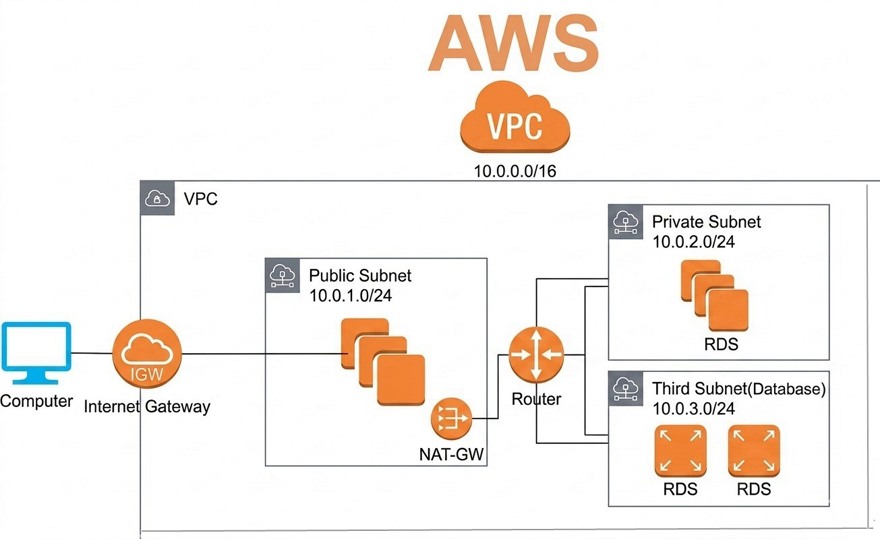
- IPv4 CIDR: 10.0.0.0/16
- Click Create VPC.
Step 2: Create Subnets
- Go to Subnets > Create subnet.
- Select MyManualVPC.
- Public Subnet: Name: Public-Subnet, AZ: us-east-1a, CIDR: 10.0.1.0/24.
- Private Subnet: Name: Private-Subnet, AZ: us-east-1b, CIDR: 10.0.2.0/24.
Step 3: Internet Gateway (IGW)
- Go to Internet Gateways > Create internet gateway. Name: MyIGW.
- Select MyIGW > Actions > Attach to VPC > Select MyManualVPC.
Step 4: Create Route Tables (RT)
- Go to Route Tables > Create route table.
- Create Public-RT and Private-RT, both attached to MyManualVPC.
- Associations:
- Select Public-RT > Subnet associations > Edit > Select Public-Subnet.
- Select Private-RT > Subnet associations > Edit > Select Private-Subnet. [19, 20, 21, 22, 23]
Step 5: Configure Public Routing
- Select Public-RT > Routes > Edit routes.
- Add route: Destination 0.0.0.0/0 | Target: Internet Gateway > Select MyIGW.
- Leave Private-RT as is (Local only).
Step 6: Create Security Groups (SG)
- Public-SG:
- Inbound Rules: Add SSH (22), RDP (3389), HTTP (80).
- Source: 0.0.0.0/0 (Everywhere).
- Private-SG:
- Inbound Rules: Add All Traffic (or specific ports).
- Source: Start typing “sg-” and select the Public-SG ID.
Step 7: Launch Two EC2s
- Public-EC2: Launch in Public-Subnet. Enable Auto-assign Public IP. Use Public-SG.
- Private-EC2: Launch in Private-Subnet. Keep Public IP Disabled. Use Private-SG.
Step 8: Verify Public Connection
- SSH (or RDP) into your Public-EC2 using its Public IP.
- Run ping google.com. It should work because of the IGW.
Step 9: NAT Gateway for Private Subnet
- Go to NAT Gateways > Create NAT gateway.
- Subnet: Choose the Public Subnet (it needs internet access to reach back to the private).
- Connectivity type: Public.
- Elastic IP: Click Allocate Elastic IP.
- Update Routing: Go to Private-RT > Edit routes > Add 0.0.0.0/0 | Target: NAT Gateway > Select the one you just made.
Step 10: Verify Private Connection
- From your Public-EC2 terminal, SSH into the Private-EC2 using its Private IP.
- Run ping google.com.
- Success: Your private server is now talking to the web via the NAT Gateway!
Pro-Tip: After you finish, delete the NAT Gateway first, as it is the only part of this lab that incurs a constant hourly cost.
Frequently Asked Questions about AWS VPC
1. Is AWS VPC (Virtual Private Cloud) free to use?
Yes, the AWS VPC service itself is free. You are not charged for creating a VPC, subnets, or route tables. However, you will incur charges for the resources and traffic within the VPC, such as:
- Public IPv4 Addresses: Charged at approximately $0.005/hour per IP.
- NAT Gateways: Hourly usage and data processing fees.
- VPC Endpoints: Interface endpoints have hourly and data processing costs.
- Data Transfer: Costs apply for data moving out of the VPC or between AWS Regions.
2. What is the difference between a Security Group and a Network ACL?
The primary difference is that Security Groups are stateful and Network ACLs (NACLs) are stateless.
- Security Group: Acts as a firewall for your instance (EC2). If you allow an “Inbound” request, the “Outbound” response is automatically allowed.
- Network ACL: Acts as a firewall for the subnet. You must explicitly define both Inbound and Outbound rules for traffic to flow.
3. Can a subnet span across multiple Availability Zones (AZs)?
No. In AWS, a subnet must reside within a single Availability Zone. For high availability and fault tolerance, you should create multiple subnets across different AZs and distribute your resources (like EC2 instances) among them.
4. What is the difference between a Public Subnet and a Private Subnet?
The distinction lies in the Route Table:
- Public Subnet: Includes a route to an Internet Gateway (IGW), allowing resources to communicate directly with the internet.
- Private Subnet: Does not have a direct route to an IGW. To access the internet (e.g., for software updates), resources in a private subnet must use a NAT Gateway located in a public subnet.
5. What is the maximum number of VPCs I can create per Region?
By default, AWS allows you to create 5 VPCs per Region. This is a soft limit; if your architecture requires more, you can submit a service quota increase request through the AWS Management Console.
6. How do I connect two different AWS VPCs?
There are two primary methods for connecting VPCs:
AWS Transit Gateway: Best for complex architectures. It acts as a central hub to connect multiple VPCs and on-premises networks, simplifying management and routing.
VPC Peering: Best for a one-to-one connection between two VPCs. It allows them to communicate using private IP addresses.
Conclusion
Final Thoughts: Future-Proofing Your Network with AWS VPC
As cloud environments become increasingly sophisticated, the AWS VPC (Virtual Private Cloud) remains the most critical tool for ensuring operational excellence and security. By mastering subnets, gateways, and peering, you aren’t just “connecting servers”—you are architecting a resilient ecosystem capable of handling global traffic and sophisticated security threats.
The transition to more automated, AI-driven networking in 2026 means that a well-configured VPC is your first line of defense and your primary engine for growth. As you continue to build, remember that the most successful architectures are those that prioritize simplicity, security, and scalability from day one. Ready to take your networking to the next level? Start by auditing your current route tables and exploring the power of VPC Endpoints today.